
“], “filter”: { “nextExceptions”: “img, blockquote, div”, “nextContainsExceptions”: “img, blockquote, a.btn, a.o-button”} }”>
Heading out the door? Read this article on the new Outside+ app available now on iOS devices for members!
>”,”name”:”in-content-cta”,”type”:”link”}}”>Download the app.
This yin yoga for hips routine takes you through some yin yoga stretches that target the flexibility in your entire lower body, with a focus on your hips, lower back, and hamstrings. When you practice these poses, you want to pay attention to the cues your body gives you and work with your body and range of motion—you’re not trying to push through or chase sensation.
Your emphasis with yin yoga is always on allowing yourself to feel supported in each stretch but also playing around with finding your edge. Then you stay still for about three minutes and let gravity do the work for you. If the stretch feels like too much, you can modify the pose or lessen the intensity by easing out of it a little.
Yin Yoga for Hips Practice to Release Tension
Throughout each pose, try to really tune into your body and your breath. Take slow, steady breaths in and out through your nose. Maybe close your eyes and notice where your awareness goes when you remain in these poses for an extended amount of time. You’re not judging your experience, you’re being curious about it.
Grab any props you have at home, ideally two blocks or substitute some firm pillows. Keep them near your mat in case you want to use them in any pose.

Child’s Pose
Begin by kneeling on the mat. Bring your big toes to touch and widen your knees as much as feels appropriate to you. Sink your hips toward your heels and bring your forehead and chest forward toward the mat in the low back stretch known as Child’s Pose. Reach your arms in front of you and then shrug your shoulders away from your ears and keep them relaxed. Breathe here.
If you feel like the mat is a little too far away from your chest or head, bring one block under your chest and the other under your forehead. You may also find this pose comfortable with a block (or pillow) underneath your behind for support.
When you’re ready, push your hands against the mat, slowly lift your chest, and walk your hands back toward you, inch by inch, until you come to hands and knees. Bring your knees beneath your hips and notice what type of movement you’d like to take.

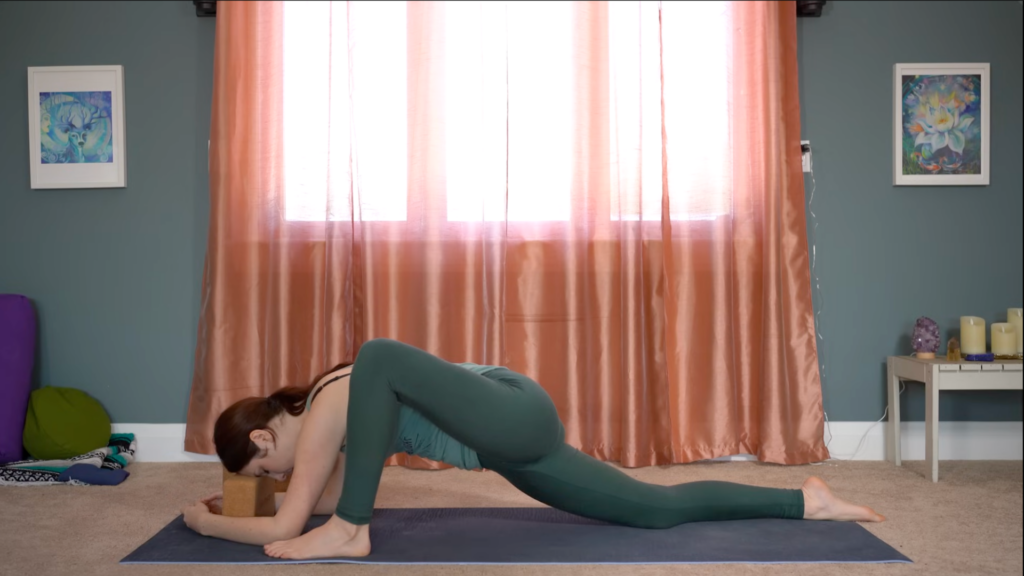
Dragon Pose
For this variation of Lizard Pose, start kneeling on the mat and step your right foot to the outer edge of your right hand. You want your knee directly over your ankle and your toes pointing forward. You can stay on your palms, you can grab your blocks and place your hands on them if the mat feels a little far away, or you can come down onto your forearms for Dragon Flying Low version.
Try pressing down through your big right toe so you’re not rolling onto the outer edge of that foot. At the same time, let your hips sink toward the mat by letting your pelvis and low back feel heavier. Take your time to settle into the shape, find your edge, and then resolve to be still. Try not to push against the mat with your hands or forearms. Breathe here.
This is a more intense stretch. If it feels difficult to let gravity pull your hips down, it’s usually because you went a little too far into the yin yoga stretch and maybe need to back off a little. Also, if it feels like you have to contract and engage the muscles in your legs to hold the stretch, that’s usually an indication that you went too far into the pose. Another sign is if you have a hard time taking slow, steady breaths. So let your breath be your guide as you hold here.
Slowly start to lift yourself. Move any props off to the side so they’re not in your way.

Reclined Deer Pose
From Dragon, slowly inch your right foot and shin enough toward the left side of the mat so you can rest your leg and hip on the mat. You want to actually roll onto that hip. You can slide a block under your hip if that helps.
Next, bend your left knee and slide it toward the front of the mat so your left knee is in line with your left hip. Bring your left ankle directly behind your left knee. This is similar to the stretch known as 90/90, named after the right angles it creates in your lower body.

Grab your props and place them behind you. Press your left hip into the mat as you start to walk your hands back at a diagonal. You might stay upright or lower onto your forearms. Or you can take a supported version with one block underneath your upper back between your shoulder blades and a second block beneath the back of your head. It takes a little maneuvering to find the right position, but once you find a configuration that feels appropriate for your body, try to let go of any lingering tension, even around your eyes and jaw, relax, and breathe here.
Keep your left knee pressing into the mat. If you find that it’s lifting, odds are you’ve leaned back a little further than your edge so ease up a little. You’re practicing internal hip rotation, working our left hip in a different kind of way than the hip opening common in yoga. Try to relax your upper body, closing your eyes and imagining you can breathe all the way down into your left hip.
Getting out of this pose can be a little tricky. Try to first tuck your chin toward your chest and then push your arms into the mat to lift your chest and come to sitting. Keep your legs in the same position.

Half Shoelace Variation
From sitting, bring your left heel behind you, closer toward your glutes, and straighten your right leg in front of you. Come into a forward fold, targeting the back of your right hip as well as your hamstrings. You’re also experiencing some internal rotation in the left leg. Stay here or fold forward.
If this configuration with your left leg doesn’t work for you, you can instead bring your left foot toward your right thigh. Fold forward any amount. And we’re gonna fold on forward, modifying in any way that you’d like, maybe stacking more than one block on top of the other to support your chest or head. You may feel more comfortable letting gravity pull you down into the pose. Try to relax as much as possible as you breathe here. No pushing, no pulling. Just complete softness and relaxation.
When you’re ready, push your hands into the mat as you lift yourself back up, slowly and mindfully. See what movement you need to recalibrate, maybe straightening your legs in front of you or doing a windshield-wiper motion with your knees.
Repeat the series of poses on your other side, coming into Dragon Pose, Reclined Deer Pose, and Half Shoelace Variation. Keep in mind it’s very normal for one hip to feel different than the other.

Reclined Butterfly
Lower yourself onto your back, bring the bottoms of your feet to touch, slide your feet a little further away from your body, and let your knees fall apart in a more relaxed version of Reclined Bound Angle. Think of lengthening your tailbone toward your heels, so you’re flattening your low back a little. It can feel good to place one block, pillow, or rolled blanket underneath each knee for support.
I like to bring my arms overhead for a gentle expansion through the chest and through the shoulders, but you can also keep your hands on your low belly or let your arms rest at your sides, palms facing upward. Close your eyes, relax your jaw, and see if you can feel the flow of your breath as it travels all the way to your abdomen. Feel your navel rise and fall as you remain still here.

Savasana
When you’re ready, make your way to Savasana, your final resting pose. This last pose is the most important one. It helps to integrate and process all the hard work you’ve done. It might not feel like you’re doing a lot, but you are. I encourage you not to rush back to life and skip it.
So straighten your legs, palms facing the sky, in full surrender and relaxation here. Let yourself relax into the mat and listen to the rhythm of your breath. Stay here for at least several minutes.
When you’re ready to come out, start to deepen your breath and feel it expand your chest and belly. Move your fingers and toes. Maybe reach your arms overhead in a stretch.
Then roll to the side, push down through your hands and arms to lift your chest, and take a seat. Roll your shoulders back and down. Then take a moment to notice how your hips feel, being curious about what changed and shifted as a result of your yin yoga for hips practice. Stay here as long as you can before you go back to your day.


Leave a Reply