At 62, I was a former dancer turned sedentary writer who spent twenty years hunched over my computer. My body ached constantly, my arthritis worsened, and exercise felt like a distant memory. But discovering yoga changed everything. Now at 67, as an ACE-certified personal trainer and Yoga Medicine Registered Therapeutic Specialist, I help other seniors transform their bodies safely through yoga. Before sharing the most effective poses for transformation, let me guide you through which poses to embrace and which to approach with caution.
These nine poses are specifically chosen for their safety and effectiveness for people over 50. Each one can be modified to match your current ability level:
Bridge (Sethu Bandha Sarvangasana)


A supine pose with bent legs. Bring your feet under your knees or as close to your body as is comfortable. Press your feet down onto the mat, and use your hamstrings, quadriceps, glutes, and core to lift your hips as high as possible. Repeat 8 to 10 times.
Cat Cow (Marjaryasana-Bitilasana)


A soft spinal flow on your hands and knees. Place your hands under your shoulders. You can be on fists if your wrists are troubled. Place your knees under your hips and lengthen your spine in neutral. Inhale to roll through your spine, lifting your head and pelvis as your belly fills into cow. Exhale to roll through your spine, drawing your belly up and in as your pelvis and head drop into cat. Move according to what feels good to you. Go deeper or less deep accordingly. Repeat 8 to 10 times.
Bird Dog (Dandayamana Bharmanasana)


A balance pose on your hands and knees. Start in the same neutral position as the start of cat-cow. Engage your core to keep your torso still as you lift your right arm to shoulder height and your left leg to hip height. Return and repeat with the left arm and right leg. Plan to inhale as you extend and exhale on return. Repeat 5-10 times per side.
Cobra (Bhujangasana)


A prone pose. Stretch out onto your belly with your hands under your shoulders. Draw your shoulders back and down. Look down or slightly ahead, keeping your head and neck aligned with your spine. Press your hands down and lift your chest into a back bend. Go as high as is comfortable to you. Keep your elbows by your side. Return to the starting position. Repeat 3 to 8 times, inhaling as you lift and exhaling on the return.
Child’s Pose (Balasana)


A relaxing counter pose. From cobra slide your hips back over your feet and lower your body towards your legs and the mat, reaching your arms forward. As with other poses, come into a position that is comfortable for you. Some people will have their hips further back, and others will be more elevated. See if you can lower your forehead to the mat. You can place a block under your head if that is too low. Breathe and relax for 3 to 6 cycles of breath. If you’ve got a few more minutes, here are four extra poses to explore.
Chair (Utkatasana)


A standing pose like a fitness squat. Stand tall with an engaged core. Hinge at your hips as you bend your knees. Keep your chest elevated as your lower body brings you closer to the floor. You can put your hands together in front of your heart. You can hinge with only a slight bend to your knees. As you practice and gain strength, try bending your knees more deeply. Repeat 6 to 10 times.
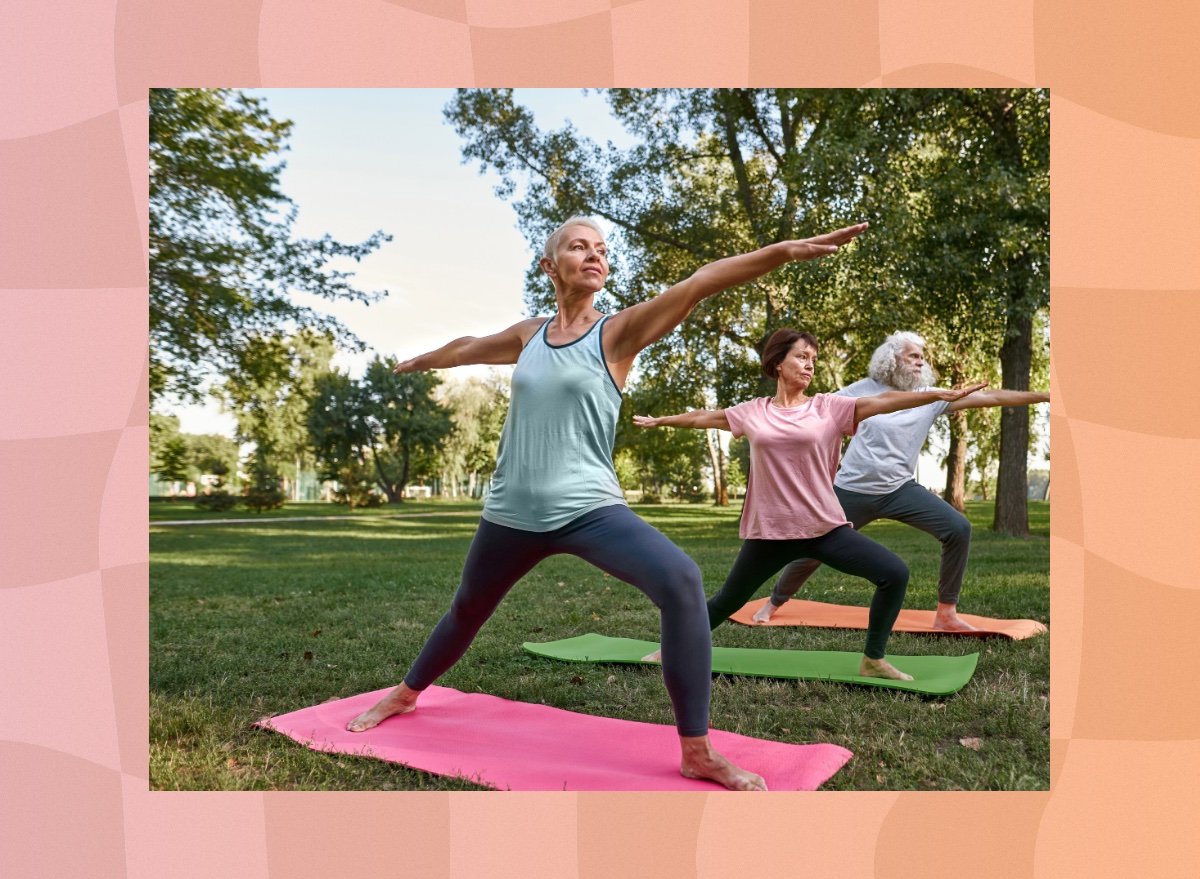
Warrior II (Virabhadrasana II)


A standing pose. Stand at the front of your mat facing the short end. Step your right foot back with your heel down and your foot at a 45-degree angle (or whatever angle is comfortable.) Keep your right leg straight as you bend your left knee, stacking it over your left ankle. Allow your hips to be at whatever angle is comfortable for you. Some people will be more toward the front of the mat, and others more open to the long edge of the mat. The correct position is where you are comfortable. Open your arms to a T-position. As you allow your hips to remain at ease, turn your shoulders and rib cage to the long edge of the mat. Your hips and shoulders will not be square. Breathe and relax. Come in and out of this position 3 to 5 times on the right and repeat on the left.
Tree (Vrksasana)


A balance pose. If you need to be near a chair or the wall, do so by all means. Stand with weight on your right leg, bend your left knee, and rotate externally. There are three options for taking the pose. The easiest is to place your left foot with your heel resting on your right ankle like a kickstand. The next level is to place your left foot on your right calf. The most challenging option is to put your left foot on your right thigh. Breathe in the pose for three to six cycles of breath. Repeat on the second side.
Twisted Root (Supta Parivrtta Garudasana)


A relaxing twist to conclude your practice before savasana. Lie down supine. Relax your body into the mat. Draw your knees toward your chest. Inhale and then exhale, lowering your knees to the left. Reach your right arm out in a T-shape and turn your head to look out over your right hand. Relax your right shoulder as you are able. Breathe in the pose for three to six cycles of breath. Repeat on the second side.
Why Body Awareness Matters When You Start Yoga


Developing body awareness is key to success on the mat. Each yoga class begins with a breathing meditation, during which I invite students to draw their attention inward. Life is distracting. We are used to paying attention to a million things all day long. Our time on the mat is an opportunity to quiet the voices and pay attention to ourselves.
From this deep body awareness, we can become aware of what we can and cannot do. For example, I have a student with arthritis in her wrists and osteoporosis. She skips downward-facing dog but does bird dog on her fists. Another student has arthritic knees and avoids bird dog but does chair pose.
Red Light Poses: What to Avoid


Shoulder stand (Sarvangasana) is a challenging pose that I do not recommend for people over 50. Traditionally, it is done on the mat by pulling the body straight up and on top of the shoulders, which puts the neck into flexion. A modification moves the weight forward by bringing the legs to a 45-degree angle. I used to practice Iyengar, where the teacher instructed us to stack pillows under our shoulders to protect our necks.
Today, I skip the shoulder stand in my practice and when teaching. However, you may be in a class where the teacher calls for this pose. Take child’s pose or another relaxing pose as an alternative.
Traditional Triangle Pose (Trikonasana) requires the student to open their hips in a manner that is uncomfortable for most people. When I first learned yoga, teachers demanded that we perform triangle pose as if our hips were on a wall. In recent years, the yoga world has smartened up as teacher after teacher required a hip replacement. Now, triangle pose is taught with students placing their hips where comfortable for them.
Yellow Light Poses: Practice with Caution


Sun Salutations – The full sun salutation includes many challenges, from jumping out to plank pose and back to forward fold and performing a full Chattaranga or Four-Limbed Staff Pose, lowering yourself with elbows beside the body to 90 degrees and then to the floor like a push-up. The full version may be beyond what you are capable of when you start practicing yoga. You may find that you cannot go through these motions because of wrist, shoulder, elbow, or other challenges. It is best to avoid as opposed to strain. There are numerous modifications to make this flow more accessible to everyone. When you are looking for classes, if you see the word Vinyasa in the description, it is likely the class includes sun salutations. Do the part that works for you and modify as you go.
Plow (Halasana) – Similar to shoulder stand, this pose takes your legs up and over your head. It can be done more or less deeply based on how it feels to you. It is an inverted pose that requires attention. Bringing your heart above your head benefits blood circulation. It stretches and strengthens your back muscles. However, don’t take this pose if you have issues with your neck or digestion. If you want to try it, do it later in your practice so you are fully warmed up. Go by how you feel to judge how long you want to stay in the pose.
Forward Fold (Uttanasana) – can be done in two variations. The first is not recommended for people with osteoporosis. In this variation, you hinge at the hip and lower your upper body over your bent knees, so your belly is on your thighs with a rounded back. If you have osteoporosis, you likely have been told not to bend forward. Dropping forward with a rounded back should be avoided. However, it is okay and healthy to hinge at the hips and lower forward with a neutral or flat back.f when starting yoga. When looking for classes, if you see the word Vinyasa in the description, it likely includes sun salutations. Do the part that works for you and modify as you go.
Plow (Halasana) and Forward Fold (Uttanasana) also require caution. If you have osteoporosis, you should avoid forward folds with a rounded back, though hinging at the hips with a neutral spine is safe and beneficial.
Common Mistakes to Avoid


The biggest mistake at any age is not paying attention to your body. I emphasize starting your practice by tuning into your body awareness. If you are in a studio class, it’s common to look at what other people are doing and try to match them rather than stay with what works for your body.
Do not ignore pain. If a pose hurts, stop and rest, and ask your teacher for a modification. Take advantage of yoga props like blocks and blankets – we call it “bringing the earth up to the body.”
Why You Shouldn’t Skip Savasana


I see people skipping the classic end of every yoga class and think that is a mistake. Savasana, or corpse pose, allows your body time to integrate the practice. It is a moment of meditation that may last five to fifteen minutes, depending on the class. This time to relax is delicious and necessary for your body to recover.
Finding the Right Teacher


If you’re looking for a class in a studio, inquire about which of their teachers works best with older students. You might have to kiss some frogs to find the right yoga class. Select a class described as gentle or beginner’s and see how you feel when you attend.
Your Path to Success


Yoga is designed to be a daily practice, but if you’re starting, begin with two to three times per week. Another approach is to start with 5 minutes daily and add time as you build your enjoyment and curiosity.
Remember, fundamentally, motion is lotion. Your practice will involve a range of movements that will ease stiffness, lubricate your joints, and expand your range of motion. Move slowly, skip any pose that doesn’t serve you, and avoid comparing yourself to others. Most importantly, allow yourself time to fall in love with your practice. And if you enjoyed this article, don’t miss How Long Your Walking Workout Should Be To Shrink Belly Fat.







Leave a Reply